February 13, 2014

Set up Apache (2.4) with php-fpm on Ubuntu 13.10

Recently I was trying to help a friend get Apache working with php-fpm on Ubuntu 13.10, I’m generally more of a CentOS guy and have recently switched to nginx from apache, so this was slightly unfamiliar territory for me.  The fact that the default php-fpm install on ubuntu uses sockets but mod_proxy_fcgi doesn’t support sockets yet,  combined with some differences between apache 2.2 and apache 2.4 made this a little tricky, so I figured that I would lay it out for anyone else looking for answers.

Step 1 – Install apache, php and enable mod_proxy_fcgi

$ sudo apt-get install apt-get install apache2 php5-fpm php5
$ sudo a2enmod proxy_fcgi

 Step 2 – Edit your php-fpm config to use a localhost port rather than a socket

In your favourite text editor (vim) open up /etc/php5/fpm/pool.d/www.conf

and change

listen = /var/run/php5-fpm.sock

to

 listen = 127.0.0.1:9000

and then restart php5-fpm

$ sudo service restart php5-fpm


Step 3 – Setup your apache virtual host file

Lets start with the default config, then edit it to match our needs. Navigate to the apache sites-available directory and copy the default config to your new config, we’ll call it yoursite.com.conf

$ sudo cd /etc/apache2/sites-available
$ sudo cp 000-default.conf yoursite.com.conf

You need to set the ServerName, DocumentRoot and add the ProxyPassMatch line along with the Directory stanza, making sure that your DocumentRoot is used for the values in ProxyPassMatch and the Directory stanza.  I like to set the document root to a folder named after the site of the virtual host inside /var/www so for yoursite.com it should look something like this

<VirtualHost *:80>
        # The ServerName directive sets the request scheme, hostname and port that
        # the server uses to identify itself. This is used when creating
        # redirection URLs. In the context of virtual hosts, the ServerName
        # specifies what hostname must appear in the request's Host: header to
        # match this virtual host. For the default virtual host (this file) this
        # value is not decisive as it is used as a last resort host regardless.
        # However, you must set it for any further virtual host explicitly.
        ServerName yoursite.com

        ServerAdmin webmaster@localhost
        DocumentRoot /var/www/yoursite.com

        # Available loglevels: trace8, ..., trace1, debug, info, notice, warn,
        # error, crit, alert, emerg.
        # It is also possible to configure the loglevel for particular
        # modules, e.g.
        #LogLevel info ssl:warn

        ErrorLog ${APACHE_LOG_DIR}/error.log
        CustomLog ${APACHE_LOG_DIR}/access.log combined

        # For most configuration files from conf-available/, which are
        # enabled or disabled at a global level, it is possible to
        # include a line for only one particular virtual host. For example the
        # following line enables the CGI configuration for this host only
        # after it has been globally disabled with "a2disconf".
        #Include conf-available/serve-cgi-bin.conf

        ProxyPassMatch ^/(.*\.php(/.*)?)$ fcgi://127.0.0.1:9000/var/www/yoursite.com/$1

        <Directory "/var/www/yoursite.com">
                Order allow,deny
                Allow from all
                AllowOverride FileInfo All
                # New directive needed in Apache 2.4.3:
                Require all granted
        </Directory>

</VirtualHost>

# vim: syntax=apache ts=4 sw=4 sts=4 sr noet


Step 4 – Setup a test page

I generally like to test new php setups with a simple phpinfo script, ensure the DocumentRoot directory you previously defined exists and create it if it doesn’t, then add a phpinfo index.php file

$ sudo mkdir -p /var/www/yoursite.com
$ sudo echo "<?php phpinfo(); ?>" > /var/www/yoursite.com/index.php


Step 5 – Restart apache and test it out

$ sudo service apache2 restart

Point your web browser to the site and you should now see a php information page!

Caveats

It appears that the proxypass doesn’t work well with apache aliases, like the ones that you get from wordpress and phpmyadmin if you install them with apt. However, if you install them “normally” by putting them in a directory on your vhost, or in the root of your vhost itself they should work assuming you have all the other required php extensions installed.

EDIT: To use Aliased sites with php-fpm you just need more proxypass rules for them, and also leave the Alias line in the config for the site (ie wordpress/phpmyadmin)

This setup works for phpmyadmin installed with apt-get install phpmyadmin. Make sure they come BEFORE the default ProxyPassMatch line in the vhost config file.  You can also move all of the proxypass lines to something like /etc/apache2/conf-available/php-fpm.conf then do “a2enconf php-fpm” to enable it.

ProxyPassMatch ^/phpmyadmin/(.*\.php)$ fcgi://127.0.0.1:9000/usr/share/phpmyadmin/$1
ProxyPassMatch ^/phpmyadmin(.*/)$ fcgi://127.0.0.1:9000/usr/share/phpmyadmin$1index.php

This is also a very simple setup, you can refer to other articles for information on how to best optimize php-fpm pools and apache performance, but this should get you a bare minimum working config suitable for a development environment or small blog.

July 26, 2013

Git + mercurial (hg) restricted shared ssh server.

I had a problem at work, where we needed to restrict vcs user’s access to only allow git and mercurial commands. There was a server that had been designated as the central repository server that everyone wash pushing to and pulling from, but as we added more users it became apparent that we should lock things down a bit to prevent repo tampering since everyone had shell access to the server and write permissions to their repos.

There are several existing solutions for this for git and mercurial individually but nothing that encompassed both of them.  I found a great idea here Code Your Own Multi-User Private Git Server in 5 Minutes and extended it to include hg commands, then locked down the hg commands using the same logic as hg-ssh. I removed the read/write logic since hg handles commands differently than git, and I can control that with file permissions for the users and repos to a certain degree.

You need to setup command restricted authorized_keys files for each user, then point the command to this script.

#!/usr/bin/env ruby
# Example authorized_keys
#
# command="/usr/local/bin/vcs-srv jconway",no-port-forwarding,no-X11-forwarding,no-agent-forwarding,no-pty ssh-rsa AAA...examplekey...zzz jconway@jordanconway.com
#
# user is passed from authorized_keys

user = ARGV[0]
command = ENV['SSH_ORIGINAL_COMMAND']
abort "No login, just git and hg commands" unless user and command

# check the supplied command contains a valid git action 

valid_actions = ['git-receive-pack', 'git-upload-pack', 'hg']
action = command.split[0]
abort "git and hg commands only" unless valid_actions.include? action

# user made a valid request so handing over to git-shell unless it's a mercurial request

Kernel.exec 'git', 'shell', '-c', command if action != 'hg'

# Make sure the hg command is safe

abort "quit trying to do fancy hg stuff" unless command.split[0] == 'hg' and command.split[1] == '-R' and command.split[3] == 'serve' and command.split[4] == '--stdio' 

# If we made it this far, execute the command as is for mercurial
Kernel.exec command

Here is an example of the authorized_keys file

command="/usr/local/bin/vcs-srv jconway",no-port-forwarding,no-X11-forwarding,no-agent-forwarding,no-pty ssh-rsa AAA...examplekey...zzz jconway@jordanconway.com

I then used puppet to manage authorized_keys files for each user.

June 3, 2013

Reset Cisco switch port/interface to default then apply vlan

I recently had to wrestle some switch port configurations back to default after applying to dumb settings to them.
This was for a Catalyst 3750x in a stack, although it likely applies to many cisco switches.

Reset interface (port) to default

Switch> en
Switch# conf t
Switch(config)# default interface Gi1/0/1
Switch(config)# exit

Unfortunately I could not figure out how to do this to the range like in the example below – it’s likely possible, but after the interface range command, trying to give the command default wanted another parameter, and I didn’t want to have to reset each config to default, so I just rant the above command for each interface, then did bulk range operations for applying the vlans.


Apply vlans to ranges or interfaces (ports)

Switch> en
Switch# conf t
Switch(config)# interface range gigabitEthernet 1/0/1-47
Switch(if-range)# switchport access vlan 100
Switch(if-range)# exit
Switch(config)# interface gigabitEthernet 1/0/48
Switch(interface)# switchport access vlan 200
Switch(interface)# exit

In that example ports 1-47 had a default vlan applied and port 48 had a management vlan applied.

May 14, 2013

Grow LUKS encrypted LVM /home partition


I run Fedora in VMware Fusion and needed more space in /home than I had initially anticipated. Luckily I had some space left on my Mac and shut shutdown the VM, went into the Fusion settings then increased the VMs disk size by 10GB after that I needed to apply the space to my /home patition which was an encrypted LV.

First step was to reboot into Single User Mode, from there I created a new ext2 partition (doesn’t really matter that it’s ext2, we’ll deal with that) with parted using the new free space this was /dev/sda3 You could also just extend the existing physical partition, but I felt safer doing it like this, and hey, that’s what LVM is for.

Take a look at your /etc/fstab and you’ll see the /dev/mapper/luks-biglonguuid device that is your encrypted partition

# Unmount the partition in question
umount /home
# Check the FS on the fedora-named luks device
fsck.ext4 -C 0 -f /dev/mapper/luks-biglonguuid
# Close the luks device
cryptsetup luksClose luks-biglonguuid
# After growing my VMWare virtual disk, I created a new partition with parted (/dev/sda3)
# Make the new partition a PV, then extend your VG to the PV
pvcreate /dev/sda3
vgextend vg_jordanfedora /dev/sda3
# Extend the home LV to take the extra space you need
lvextend -L+10G /dev/vg_jordanfedora/lv_home
# Open the crypt mounted on a temp device, here called "mytempdevice"
cryptsetup luksOpen /dev/vg_jordanfedora/lv_home mytempdevice
# Resize the crypt temp device
cryptsetup --verbose resize mytempdevice
# Mount it and make sure your files are there
mount /dev/mapper/mytempdevice /home
# It worked! Unmount it
umount /home
# Another fsck
e2fsck -f /dev/mapper/mytempdevice
# Grow the FS to match the size of the device
resize2fs /dev/mapper/mytempdevice
# Reboot the machine so fedora can do it's luks-biglonguuid decryption on boot
reboot

And there you have it!

Originally learned this from here and expanded on the explanations a bit http://blog.gauner.org/blog/2010/01/23/resize-a-luks-partition-on-lvm/

February 27, 2013

Node.js Centos 6.3 RPM Spec

I’m trying my best to keep a spec file for node.js updated on github whenever there’s a new stable release since there’s no ‘simple’ way to install it in CentOS.

I haven’t used node.js much at all, but it’s very interesting from what I’ve seen and some of my favourite developers are singing it’s praises.  If you’re interested in it, take a look at the spec file on my very meager github page – I didn’t write it, but when I found it it was several versions behind so I updated it and have taken it upon myself to keep it up to date with each stable release. As of this posting it’s at version 0.8.21

https://github.com/jordanconway/node-rpm-spec

This is also my first post in around 3 years, in that time I’ve gone from an inside sales representative at an industrial supply company with a passion for technology to a System Administrator working in the clinical research field specializing in Linux and virtualization – yay me!

December 8, 2009

Enable Flash on Google Chrome Beta in Ubuntu 9.10 Karmic Koala

Today Google released Google Chrome Beta for Linux/mac.

This is the actual Google branded version of Chromium which has been available on Linux for quite some time now.  I installed Google Chrome only to find out that Flash did not Work on it.  Being no stranger to flash not working on linux, I poked around a bit until I found a solution.

UPDATE: It appears that Flash will work if you import your settings from Firefox when you install it, however if you’re a Chromium user and did not import any settings when you installed Chrome this should fix you right up.

The following applies to my experience with Ubuntu 9.10 64bit and Google Chrome Beta 64bit.

I’ll assume that you are already using Flash in Firefox or Google Chromium.

Fist we’re going to find your flash plugin: Open up a terminal window and type (always leaving out the quotations)

“sudo updatedb”

This will update the database that “locate” uses to find things with. Next we’ll use locate to find your flash plugin.

“locate libflashplayer.so”

That should show you the location of your Flash plugin, something like “/usr/lib/chromium-browser/plugins/libflashplayer.so” or “/usr/lib/mozilla/plugins/libflashplayer.so”

What we need to do is make a directory for the plugin in the default Google Chrome install directory which is “/opt/google/chrome/”

so back to the terminal window and type

“cd /opt/google/chrome”

now once there type:

“sudo mkdir plugins”

Now we need to copy libflashplayer.so to the newly created plugins directory

“sudo cp /usr/lib/chromium-browser/plugins/libflashplayer.so /opt/google/chrome/plugins/”

make sure to replace the bold /usr/lib/chromium-browser/plugins/libflashplayer.so with the output of your previous search “locate libflashplayer.so”

Once that’s done Youtube and all other flash sites should work perfectly well on Google Chrome Beta

December 3, 2009

My first Chrome Extension – Simple Print

I’ve been really enjoying Google Chrome lately.

I had been a big fan of Firefox for many years, but after playing around for a while with the dev channel versions of Chrome -called Chromium- I have come to really appreciate the speed increase I get using Chrome/Chromium instead of Firefox. Now that Chrome has the ability to have addons – extensions as they’re called in Chrome – I have very little need for Firefox anymore.  There are however some things from Firefox that I miss. Small things, like the ability to have a “Print” button on your toolbar.  So I scrounged around a bit and after some trial and error I came up with my first chrome plugin “Simple Print”

It is very, very simple.  All it does it put a print button on your chrome bar.  You click the button and it brings up a print dialog.  That’s it.  It may get more features eventually, but for now, It is just a print button.

Simple Print Screenshot

If you’re interested you can download and install it here!

Simple Print
Simple Print

UPDATE:  I’m on the official Google Chrome Extensions Gallery

Note that you will need to have the beta or  dev channel version of Chrome installed.  you can find that here http://www.google.com/landing/chrome/beta/ or here http://www.chromium.org/getting-involved/dev-channel

I have tested this on Ubuntu 9.10, Windows XP, Windows Vista and Windows 7 it seems to work on all of them.

It’s a super simple addon, but if you’re interested in the source code drop me a line. The icon used came from the “humanitarian” gnome icon theme available here.

EDIT:

There seems to be some problems with my extension right now (not printing or printing blank pages only) I’m working hard to figure it out, when I’ve got it I’ll update it here and if you have it installed it should automatically update your copy as well. I have reason to believe that it (and the two other print extensions that have since popped up) are broken because of this bug http://code.google.com/p/chromium/issues/detail?id=29621

April 2, 2009

Jordan Teaches – RSS & Google Reader

While I’m still trying to figure out exactly what I’m doing with this page I came up with an idea for a recurring segment called “Jordan Teaches”.  I know a lot of stuff.  In this segment I share some of my knowledge with you.

For the inaugural post of Jordan Teaches I’ll teach you about RSS and Google Reader.

RSS stands for Really Simple Syndication.  I’m not going to go all Wikipedia on you, but essentially it distils the essence of a webpage or blog post and makes it readily available for syndication, or sharing.  Like when your favourite TV show goes into syndication and networks other than the one that owns it can pick it up and play it whenever they want to.  It’s the same for many webpages, but you don’t need to wait until the 100th episode, you can do it whenever.

The advantage to this is that you can read all of your favourite sites at the same place, and keep track of unread articles and be notified of new articles as soon as they are available.

RSS can syndicate posts or pages to many places, but the most common one is to a Newsreader or RSS reader program.  There are many of these available, but in the interest of operating system neutrality I won’t get into the various Windows, Mac or Linux options available, I’m going to talk about Google Reader.

Google reader is free and accessible from anywhere you can get the web, even your phone.

You can go check it out here: http://www.google.com/reader

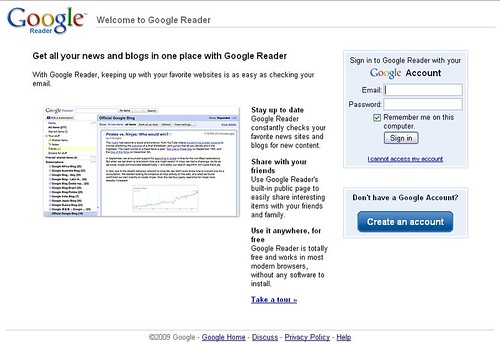
It probably looks something like this

greader1

Now if you’ve already got a Gmail account or other google account the good news is that you’ve got a Google Reader account!  If not, you’ve got to sign up, gmail is great, but I’m not going to talk about that for now, just sign yourself up for google reader then sign in.  You’re ready to go!

The next step is finding the RSS feeds for your favourite sites.  A feed is pretty much the stream, or channel if you would that tunes your RSS reader to the site you want.

The de facto international symbol for RSS is this orange guy here:

128px-Feed-icon.svg

Look around at your favourite page for this guy, or a variation of and give it a click.

Now this is where it gets kind of tricky depending on what internet browser you’re using it will handle RSS feeds differently.

If you’re using Internet Explorer 7 I’ll let the fine people over at the Google Operating System blog explain what to do from here.

Add Feeds to Google Reader in Internet Explorer 7

I imagine it’s similar with the newly release Internet Explorer 8 also.

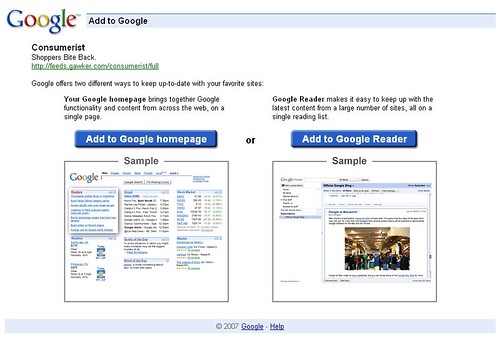
However if you’re using Firefox (which is currently my browser of choice) when you click on an RSS feed for the first time you’ll be presented with something like this:

rss3

Check the box that says “Always use Google…” and then click Subscribe Now.  You only have to do this once.  Once it’s done it will bring you to the next screen which is what you’ll see from now on whenever you click an RSS feed.

greader5

Click the Add to Google Reader button and you’re done!

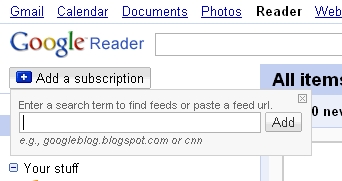
Or you can click the “Add a Subscription button in Google Reader and paste the RSS feed address in there.

greader4

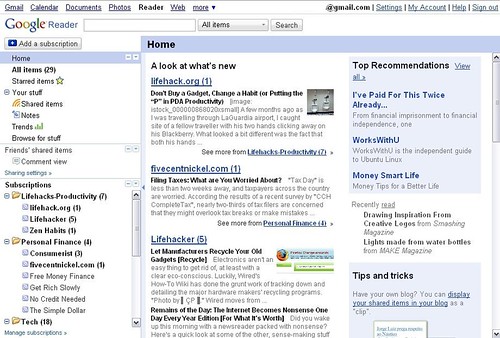
It seems like a lot of steps, but it’s actually quite simple.  Once you’ve got some of your favourite sites added to Google Reader the main Reader page looks like this

greader2

This is my google reader page, you can add Tags to posts that organize them in the sidebar by folder, you can search in the top to go through everything you’ve ever read to find that funny cat picture that you saw last week, but can’t remember where.  It’s great.

Google Reader has literally changed the way I use the web.  No more going from bookmark to bookmark, I just load up Google Reader and scroll through all of my favourite sites, all in the same place.  It removes the flashy and distracting colours from the sites you read (pro or con, depending on how you look at it)  It gets rid of most of the advertising that you see on sites.  It cuts off the inane comments that go along with many articles and it just makes the web a crisper, cleaner, easier to read place.

That’s it for this first issue of Jordan Teaches.  I was probably too verbose,  and maybe a little confusing, but I’m new at this, I’ll work on paring it down more in future episodes of Jordan Teaches.  I hope you learned something.

Cheers,

-Jordan

March 29, 2009

Jordan’s Journal March 29th, 2009

Sunday morning.  A blog was born on the internet.  Nobody knows why.  Nobody cares.

Hi I’m Jordan Conway.  I live in Montreal.  This is my attempt at setting myself apart from the other Jordan Conways in the world.

Not Me:

From what I can tell there’s a skateboarder/photographer in California named Jordan Conway; he is not me (but he does take very nice pictures).

There’s also some kid in Nova Scotia named Jordan Conway who seems to be nicknamed Plem, even though there’s a Facebook group about him that uses a picture of me they found on Google; he is not me.

Some chick in the UK. She is definately not me, although she has pretty good google ranking. (What the heck is bebo?)

Me:

This is me on Facebook.  I’ve kind of grown away from facebook, much like many of the facebook “friends” that I have, I don’t see facebook much anymore.

This is me on Twitter. I barely understand twitter, but I have an account.  I’ve seen cool things where you can have your plants tweet when they need water, or tweet your electricity usage, maybe one day I’ll do something cool like that.

I’ve got a flickr account but no photos are up yet.  I’m pretty good at taking pictures.  I used to have my own darkroom.  I just haven’t gotten around to putting anything on flickr, seems like a waste if it’s not a pro account, but you never know…  I should probably check that out.

That’s it for now.

Cheers,

-Jordan